Scenario
You need to secure internal websites running on a private network such as lab environments, development servers, or internal tools but public Certificate Authorities cannot issue certificates for private IPs or internal hostnames. Browsers show HTTPS warnings, and relying on self‑signed certificates becomes messy and untrusted across devices.
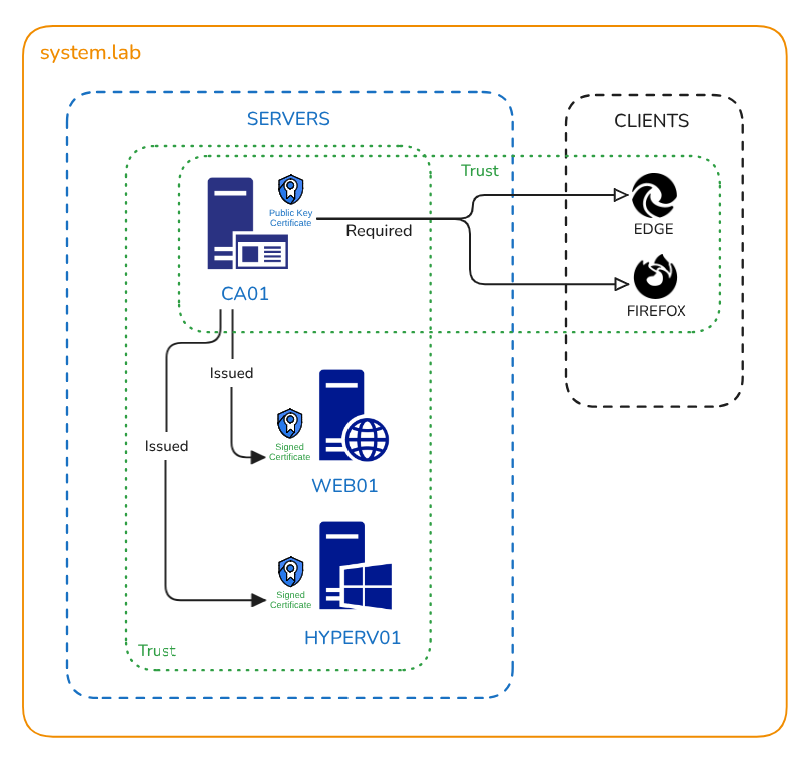
To fix this, you set up your own local Certificate Authority (CA) on Ubuntu Server, generate a trusted root certificate, and issue valid HTTPS certificates for internal servers like WEB01. Once the CA’s root certificate is trusted by client machines, all internal sites load securely with no warnings.
Lab Objectives
- Set up a local Certificate Authority (CA) on Ubuntu Server
- Generate a root certificate and private key
- Create and sign certificate requests for internal websites
- Install the signed certificate on a web server (WEB01)
- Trust the CA root certificate on client machines to eliminate HTTPS warnings
- Validate secure HTTPS access to internal sites
Prerequisites
- A private network (I used VirtualBox with a
NATnetwork). - Virtual server for Certificate Authority:
CA01- A standard install of Ubuntu server.
- Virtual server with test website needed a secure certificate:
WEB01- Apache web server.
- Virtual server with Windows Admin Center that needed a secure certificate:
HYPERV01- Hyper-V server (I used nested virtualisation).
- Two client PCs used for testing:
- Windows 10
- Ubuntu Desktop
Why a Local Certificate Authority?
Public websites rely on commercial Certificate Authority's (CA) to establish trust and secure traffic. Internal servers often raise browser warnings, even if they serve critical content. That’s where your own CA steps in, enabling encrypted, trusted connections without ongoing costs.
Set Up the Certificate Authority
- On the Ubuntu Server
CA01install theeasy-rsatoolkit.
sudo apt install easy-rsa
- Create a dedicated directory for your CA’s assets, link CA files from their default location and set secure permissions to the directory (only root has full permissions).
mkdir ca01
ln -s /usr/share/easy-rsa/* ca01
chmod 700 ca01
- Change to directory and initialise the Public Key Infrastructure (PKI) with
init-pki.
cd ca01
./easyrsa init-pki
- Create a copy of the example
varsfile. Thevarsfile in Easy-RSA is essentially a configuration file that defines default values used when generating certificates. Then customise the certificate details and save the file.
cp vars.example vars
vim vars
The following settings were un-commented and customised in the vars file:
set_var EASYRSA_REQ_COUNTRY– Country code (e.g 'GB')set_var EASYRSA_REQ_PROVINCE– State or provinceset_var EASYRSA_REQ_CITY– City or localityset_var EASYRSA_REQ_ORG– Organisation nameset_var EASYRSA_REQ_EMAIL– Contact emailset_var EASYRSA_REQ_OU– Organisational unit
vars file, like country, organisation, and email, don’t need to be accurate; they’re only visible to devices within your network and won’t affect functionality.- Build the certificate authority and set the secure passphrase which will be required when signing certificate requests.
./easyrsa buildca
You will need to set the common name using a FQDN like ca01.system.lab
The CA is now ready to issue certificates using it's private key which is stored in pki/private directory.
Trust the CA on Client Machines
Adding the CA’s public certificate (stored in pki directory) to a computer tells it to trust any website or server that uses a certificate signed by that CA. This makes the browser stop showing security warnings and allows secure HTTPS connections.
Windows Server (HYPERV01)
- Copy the public certificate from the CA server using SCP to the
Documentsfolder.
scp rajinder@ca01:/home/rajinder/ca01/pki/ca.crt Documents
The certificate can be installed by double clicking on it and choosing the install certificate option, with store location of Local Machine and in the Trusted Root Certification Authorities store.
Ubuntu Server (WEB01)
- Copy the public certificate from the CA server using SCP to the current directory
.
scp rajinder@ca01:/home/rajinder/ca01/pki/ca.crt .
- In Firefox:
- Open Preferences > Privacy & Security > Certificates > View Certificates
- Import under Authorities, and select Trust this CA for websites.
Create and Sign Certificate Requests
A Certificate Signing Request (CSR) is a file a server creates when it wants a trusted certificate from a Certificate Authority (CA). It contains the server’s public key and identity details, such as its hostname, organisation, and location. The CSR is digitally signed using the server’s private key, proving ownership of the key pair.
This request is sent to the CA, which verifies the information and uses its own private key to sign the CSR, issuing a certificate that clients and browsers can trust because the already trust the CA.
On the our internal CA server, we’ll generate CSRs and sign them for each internal server.
Create temp directory for storing certificates for signing requests
mkdir tmp_csr
cd tmp_csr
Create private key and CSR for WEB01
openssl genrsa -out web01.key
openssl req -new -key web01.key -out web01.req
The most important setting is the common name, it must match the URL of the website that the certificate is for, in this case: web01.system.lab
Create private key and CSR for HYPERV01
openssl genrsa -out hyperv01.key
openssl req -new -key hyperv.key -out hyperv01.req
The most important setting is the common name, it must match the URL of the website that the certificate is for, in this case: hyperv01.system.lab
Import and sign the Certificates
./easyrsa import-req tmp_csr/web01.req web01
./easyrsa sign-req server web01

./easyrsa import-req tmp_csr/hyperv01.req hyperv01
./easyrsa sign-req server hyperv01
The resulting signed certificates are stored in the issued directory.
Install Certificates on Servers
Signed certificates need to be installed on the requesting servers so they can prove their identity to clients, without them, browsers won’t trust the server, and secure HTTPS connections won’t be established.
For the Apache web server WEB01:
Create a local certs directory and copy both the private key and the signed certificate via SCP.
sudo mkdir /etc/apache2/certs
scp rajinder@ca01:/home/rajinder/ca01/tmp_csr/web01.key /etc/apache2/certs/
scp rajinder@ca01:/home/rajinder/ca01/pki/issued/web01.crt /etc/apache2/certs/- Update Apache’s config
/etc/apache2/sites-enabled/000-default.confto:- Use port 443 (change from port 80 to 443 in
<VirtualHost *:80>)
- Use port 443 (change from port 80 to 443 in
- Enable SSL
SSLEngine on - Point to the certificate and key files.
SSLCertificateFile /etc/apache2/certs/web01.crt
SSLCertificateKeyFile /etc/apache2/certs/web01.key
- Turn on SSL and Restart Apache
sudo a2enmod ssl
sudo systemctl restart apache2
Now when we test on both clients, https://web01.system.lab is showing as secure and encrypted, this is because the browser trusts the internal CA server ca01 using it's public certificate. The CA has a trust relationship with WEB01 and so let's the browser know that it's safe to proceed.
For the Hyper-V server HYPERV01:
First the signed certificate we generated earlier needs to be converted into a PFX format. This conversion is required because Windows servers prefer certificates in this format, which bundles both the private key and the signed certificate into a single file for easier import and management.
- Convert signed certificate to create the PFX file on
CA01server.
cd ca01
openssl pkcs12 -inkey tmp_csr/hyperv01.key -in pki/issued/hyperv01.crt -export -out pki/issued/hyperv01.pfx
- On
HYPERV01get the.pfxfile using SCP.
scp rajinder@ca01:/home/rajinder/ca01/pki/issued/hyperv01.pfx .
- Import the PFX certificate using PowerShell and store it under
LocalMachine\My
$password = ConvertTo-SecureString "YourPassword" -AsPlainText -Force Import-PfxCertificate -FilePath "hyperv01.pfx" -CertStoreLocation Cert:\LocalMachine\My" -Password $password
PowerShell will provide the thumbprint of the certificate in the output of the above command, which we'll use to install the certificate in Windows Admin Center.
- Update Windows Admin Center by running the install file for WAC and enter the thumbprint above, the install will then install the certificate.
Now when we test on both clients, https://hyperv01.system.lab is showing as secure and encrypted, this is because the browser trusts the internal CA server ca01 using it's public certificate. The CA has a trust relationship with HYPERV01 and so let's the browser know that it's safe to proceed.
Conclusion
This lab successfully walked through the complete process of setting up a local Certificate Authority to secure internal websites with trusted HTTPS encryption. By generating your own CA, distributing its public certificate to client machines, and issuing signed certificates to internal servers, you can build a private trust system that mirrors the security of the public web, without relying on external vendors.
